In the earlier parts we got the ESP8266’s IP address by displaying it in the serial monitor. This is OK for examples and development but not practical for real life projects. There are a few ways to get the IP address, here I look at mDNS. mDNS allows you use to connect to the ESP8266 using a name or url.
This sounds great, and it is unless you are an Android user. More on that later.
What is DNS?
Domain Name System (DNS) is similar to an address book. It is a system that converts names to numbered addresses. To make life a little easier for people, websites generally use easy to remember names, such as www.google.com but this is not the real address of the website. The real address is a number or IP address. The ip address for google is 172.217.22.78. So when you enter www.google.com in your browser, the computer first goes off and looks up the IP address from a DNS server. After it has the ip address it contacts the website (or more specifically, the server hosting the website).
The above is a very simple overview and the actual DNS system is a little more complex. If you want to know more a good place to start is with The Internet Domain Name System Explained for Non-Experts by Daniel Karrenberg of the Internet Society.
DNS is fine for normal websites but not particularly friendly for small devices with limited resources. Luckily we have mDNS or multicast DNS.
What is mDNS?
mDNS stands for multicast DNS. This is a system that allows devices such as the ESP8266 to utilize a DNS style system (urls) rather than numeric ip addresses. mDNS does a similar thing to regular DNS but in a different way.
mDNS uses urls with a .local suffix, such as esp8266.local or http://esp8266.local. When you enter a .local address in to a browser it sends out a signal (a multicast hence the name) to all the devices connected to the local network asking the device with this address to identify itself. The device does this by sending back its actual ip address. The browser then knows the ip address to use.
Thanks to a nice library, mDNS is very easy to use on the ESP8266. All you need to do is include the library and initialise it.
At the top of the sketch include the library
#include <ESP8266mDNS.h>; |
Then a little later, usually in the setup() function initialise the library. Any name can be used.
MDNS.begin("esp8266"); |
Using “esp8266” means the url will be esp8266.local.
MDNS.begin() returns TRUE or FALSE depending if the initialising was successful or not. This means we can check and issue an error message if the initialisation fails.
if (!MDNS.begin("esp8266")) { Serial.println("Error setting up MDNS responder!"); } else { Serial.println("mDNS responder started"); } |
Arduino Sketch: ESP8266_LED_Control_05_Station_Mode_with_mDNS
You should be able to see that this is the same sketch as the last example except for the new mDNS lines.
/* * Sketch: ESP8266_LED_Control_05_Station_Mode_with_mDNS * Control an LED from a web browser * Intended to be run on an a ESP8266 */ #include <ESP8266WiFi.h> #include <ESP8266mDNS.h>; // change these values to match your network char ssid[] = "MyNetwork_SSID"; // your network SSID (name) char pass[] = "Newtwork_Password"; // your network password WiFiServer server(80); String header = "HTTP/1.1 200 OK\r\nContent-Type: text/html\r\n\r\n"; String html_1 = "<!DOCTYPE html><html><head><meta name='viewport' content='width=device-width, initial-scale=1.0'/><meta charset='utf-8'><style>body {font-size:140%;} #main {display: table; margin: auto; padding: 0 10px 0 10px; } h2,{text-align:center; } .button { padding:10px 10px 10px 10px; width:100%; background-color: #4CAF50; font-size: 120%;}</style><title>LED Control</title></head><body><div id='main'><h2>LED Control</h2>"; String html_2 = ""; String html_4 = "</div></body></html>"; String request = ""; int LED_Pin = D1; void setup() { pinMode(LED_Pin, OUTPUT); Serial.begin(9600); delay(500); Serial.println(F("Serial started at 9600")); Serial.println(); // We start by connecting to a WiFi network Serial.print(F("Connecting to ")); Serial.println(ssid); WiFi.begin(ssid, pass); while (WiFi.status() != WL_CONNECTED) { Serial.print("."); delay(500); } Serial.println(""); Serial.println(F("[CONNECTED]")); Serial.print("[IP "); Serial.print(WiFi.localIP()); Serial.println("]"); if (!MDNS.begin("esp8266")) { Serial.println("Error setting up MDNS responder!"); } else { Serial.println("mDNS responder started"); } // start a server server.begin(); Serial.println("Server started"); } // void setup() void loop() { // Check if a client has connected WiFiClient client = server.available(); if (!client) { return; } // Read the first line of the request request = client.readStringUntil('\r'); if ( request.indexOf("LEDON") > 0 ) { digitalWrite(LED_Pin, HIGH); } else if ( request.indexOf("LEDOFF") > 0 ) { digitalWrite(LED_Pin, LOW); } // Get the LED pin status and create the LED status message if (digitalRead(LED_Pin) == HIGH) { // the LED is on so the button needs to say turn it off html_2 = "<form id='F1' action='LEDOFF'><input class='button' type='submit' value='Turn off the LED' ></form><br>"; } else { // the LED is off so the button needs to say turn it on html_2 = "<form id='F1' action='LEDON'><input class='button' type='submit' value='Turn on the LED' ></form><br>"; } client.flush(); client.print( header ); client.print( html_1 ); client.print( html_2 ); client.print( html_4); delay(5); // The client will actually be disconnected when the function returns and 'client' object is detroyed } // void loop() |
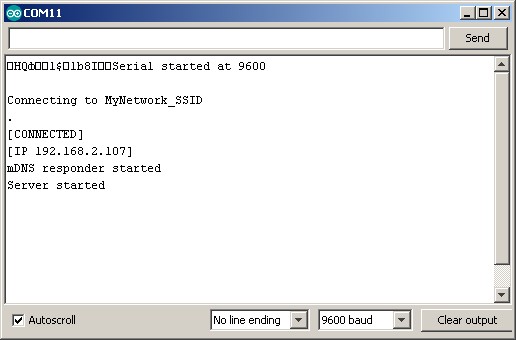
Upload the sketch and open the serial monitor. The ESP8266 should connect to your wifi and display the ip address in the serial monitor as before.

Using a PC or an IOS device (not an Android device) open a browser and go to the ip address (in my case it is 192.168.2.107). You should have the same webpage as before.
Now try using the mDNS service. Open a new tab or page in the browser and go to esp8266.local. Hopefully you should see the same webpage.

Android and mDNS
Unfortunately mDNS does not work on Android. It is there but not implemented in any of the web browsers. To get around this we can use one of the wifiManager libraries. This is covered in the next part.
Update for Windows 10
Unfortunately mDNS and .local domains have some issues on Windows 10 and may not be available by default. The easiest way to add it is probably using Apples Bonjour Print Services for Windows. Just download and install. Bonjour is Apples implementation of the zeroconfig/mDNS protocol.
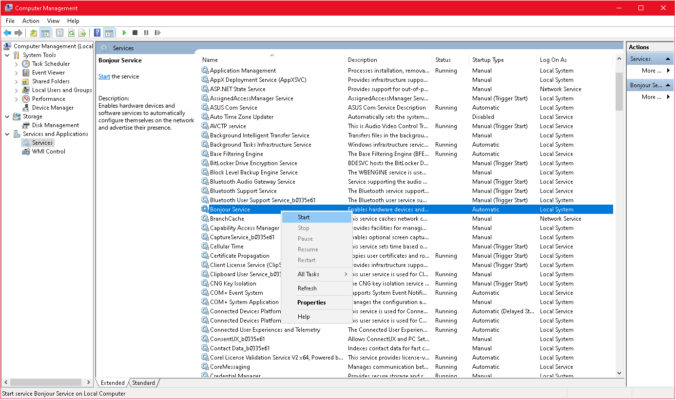
It is worth checking to see if you have the Bonjour service installed but not active. Open Computer Management, expand Services and look for Bonjour. If it is not running, right click and select Start.

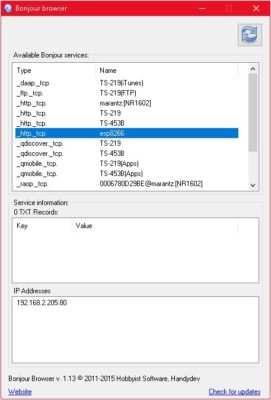
If you continue to have problems Bonjour Scanner by Hobbyist Software can be helpful. Does exactly what it says on the tin. Scans the local network for Bonjour enabled devices.


Hi Martyn, Very good tutorial so far. However, esp8266.local is not working on Safari or Chrome on MAC, iOS and Windows 7.
Vraiment c’est bien expliqué et très clair, mais malheureusement ça ne fonctionne pas sous W7. Merci encore et à bientôt
Encore un grand merci pour ces belles explications .
Remarque : le mDNS ne fonctionne pas sous Windows 7…
I am no software guy by any means yet tried activating mdns on android by installing printer apps like LetsPrintDroid , Printershare and Printbot which use mdns and lo and behold – both chrome and firefox immediately started recognizing esp8266.local! It may be useful for many of us to simply install these apps so that browsers on android become useful on iot plateforms. May be some of the wise software guys find out which of the three did the trick.
Nice tutorial so far.
But on Windows 10 (with Bonjour) and on my iPad2 esp8266.local isn’t recognized.
Do you have any suggestions?
Many thanks in advance!
Sorry, the website esp8266.local cannot be found.
seems to miss and i get this reply from my ISP’s dns server, with some added spam advertising . . . .
same in FF chrome and IE, time for some serious google searching
No problem with Win10 using Firefox, Chrome or Firefox.
Not found on Android 10 on Chrome and Firefox,.
i cannot Ping esp8266.local, but I can ping the server by ip address. I have the bonjour service running and checked it in services on windows 7. I have rebooted the computer, router and esp. Do you have any ideas of what I might be missing
here is that portion of my sketch
if (!MDNS.begin(“esp8266”)) { Serial.println(“Error setting up MDNS responder!”); }
else { Serial.println(“mDNS responder started”); }
// start a server
server.begin();
Serial.println(“Server started”);
It may be worth while checking the OS can see zero config services by using one of the browser apps such as https://hobbyistsoftware.com/bonjourbrowser and https://www.tobias-erichsen.de/software/zeroconfservicebrowser.html
Also try using the fully uri http://esp8266.local
the reason why the .local is not working is because the loop() is missing a line of code. Insert “MDNS.update();” inside the loop and it will work.