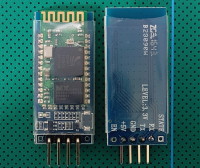
 The HC-06 (ZG-B23090W) uses a regular smd Bluetooth module based on the csr BC417 chip with a MX 29LV800CBXBI-70G flash memory chip. The firmware is well documented and a Google search for “HC-06 linvor V1.8” should get you more than a few hits.
I have received a few comments about HC-06 and HC-05 modules that use a new breakout board (new to me at least). When I received the first comment I hadn’t seen these modules, by the time I had received the 4th or 5th comment the modules were all over Taobao so I decided to order a few (2 x HC-06 and 2 x HC05). I have no real use for these except to see if they are different to previous versions.
The HC-06 is a Bluetooth 2.0/2.1 EDR device that has a serial UART layer on top of the Bluetooth. The UART layer makes them extremely easy to use but hides the Bluetooth functions from the user. This is good if all you want is to make 2 things talk to each other.
The HC-06 has 2 modes of operation; AT mode and transmission mode. When the modules are first powered on they go in to AT mode. Here AT commands can be entered via the wired serial connection. After a connection has been made the modules go in to transmission mode. Here everything the modules receives via the wired serial connection is sent to the connected device. At commands cannot be entered again until the connection is broken.
HC-06s are slave only modules and require a master device to make a connection. Slave devices cannot initiate a connection which means you cannot link 2 HC-06s together. The master module is the HC-05 which can be either slave or master. Since the price for the HC-05 and the HC-06 is basically the same I would suggest buying HC-05s and not HC-06s.
HC-06 (ZG-B23090W): Basic Specs
Slave only module
Bluetooth 2.0 EDR
Based on the csr BC417 chip
Firmware is linvor V1.8 which is (I think) created by Wavesen and getting a little old.
Default baud rate for serial UART is 9600
AT commands need to be uppercase without line endings.
Hard to know if these are copies or not (I suspect they are). Wavesen are the manufactures of the original HC series of Bluetooth modules and their modules now feature the HC logo screen printed on the Bluetooth SMD board (the small daughter board) and a blue LED at the top right. Since these modules do not have the logo nor the blue LED I presume they are copies. But, the photos in the data sheet feature modules without the logo. Bare in mind the data sheets are from 2010 and 2011.
The datasheet available from the Taobao sellers is the Wavesen Chinese data sheet. You can download it at the bottom of the page. Note that the data sheet looks to be version 2.0 but the firmware is 1.8. All the commands in the data sheet work though. I have included an older English data sheet for the same firmware in the downloads section below.

The HC logo
HC-06 (ZG-B23090W): First try
The first thing with any new Bluetooth module is to power them up and see if they work and what name they transmit. Both modules seem to work fine and they transmit “HC-06”. So no surprises there. The modules pair with the PIN “1234”. Again this is standard.
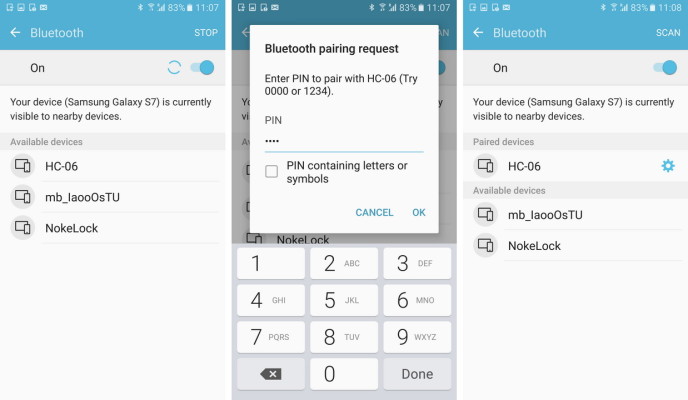
When powered on the LED flashes about 10 times a second. When there is an active connection the LED is solid on.
HC-06 (ZG-B23090W): AT Commands
The HC-06 starts in AT command mode on power on and expects commands to be uppercase without line endings (so no \r\n characters).
The HC-06 does not have many commands, apart from setting the baud rate and renaming it, there isn’t a lot you can do.
| Command | Comment |
| AT | Communications test Returns “OK” |
| AT+VERSION | Check the firmware version ID Returns “linvorV1.8” |
| AT+BAUDx | Set the baud rate used for serial UART communication x = single digit hex value number from 1 to C: 1———1200 2———2400 3———4800 4———9600 (Default) 5———19200 6———38400 7———57600 8———115200 9———230400 A———460800 B———921600 C———1382400 Replies with OKxxxx where xxxx is the new baud rate. For example “AT+BAUD4” replies with “OK9600” Take care. Most PCs cannot use a baud rate above 115200. |
| AT+NAMEnewname | Change the name of the module Replies with “OKsetname” The maximum length is 20 characters. You may need to reset the module before the new name is broadcast. |
| AT+PINxxxx | Change the PIN. The new PIN must be 4 numeric characters |
| AT+PN | Set the parity to None |
| AT+PE | Set the parity to Even |
| AT+PO | Set the parity to Odd |
The baud rate and PIN cannot be interrogated so take care when setting. Although the PIN can be reset using AT commands you need to know the baud rate to use AT commands. Most PCs cannot use a baud rate above 115200 and there is not way to hardware reset these modules.
HC-06 (ZG-B23090W): Communication and AT commands
Next up is to see if we can talk to them using AT commands. I normally use the Arduino serial monitor. There are a few ways to connect serial Bluetooth modules to a PC. The main two are; via a serial UART adapter, or, by using an Arduino and a serial-in serial-out sketch.
HC-06 (ZG-B23090W): Arduino and a serial-in serial-out sketch
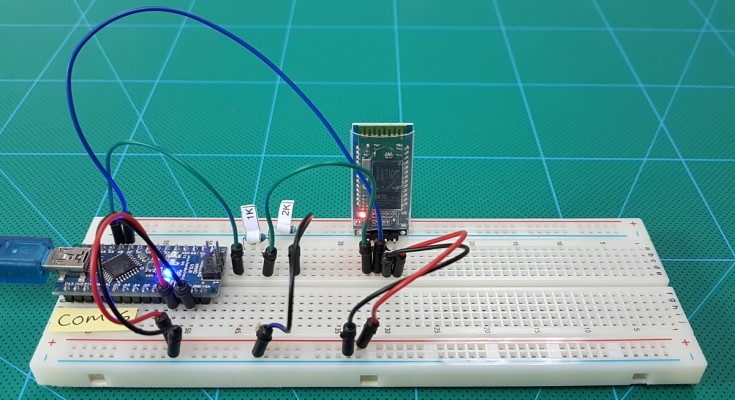
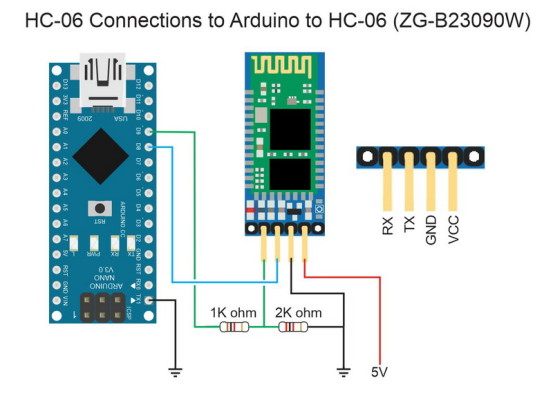
Uing an Arduino and a simple serial in – serial out sketch.
The 2 resistors form a voltage divider and reduce the 5V Arduino TX pin to 3.3v. The Arduino reads 3.3v as HIGH so we do not need to convert the 3.3v on the BT module TX pin. We can connect it directly to the Arduino RX pin.
The Arduiono Sketch:
// veryBasic_SerialInSerialOut_001 // // Uses hardware serial to talk to the host computer and Software Serial for communication with the bluetooth module // // What ever is entered in the serial monitor is sent to the connected device // Anything received from the connected device is copied to the serial monitor // // Pins // BT VCC to Arduino 5V out. // BT GND to GND // Arduino D8 (SS RX) - BT TX no need voltage divider // Arduino D9 (SS TX) - BT RX through a voltage divider (5v to 3.3v) // #include <SoftwareSerial.h> SoftwareSerial BTserial(8, 9); // RX, TX char c=' '; void setup() { Serial.begin(9600); Serial.print("Sketch: "); Serial.println(__FILE__); Serial.print("Uploaded: "); Serial.println(__DATE__); Serial.println(" "); BTserial.begin(9600); Serial.println("BTserial started at 9600"); Serial.println(" "); } void loop() { // Read from the Bluetooth module and send to the Arduino Serial Monitor if (BTserial.available()) { c = BTserial.read(); Serial.write(c); } // Read from the Serial Monitor and send to the Bluetooth module if ( Serial.available() ) { c = Serial.read(); BTserial.write(c); } } |
HC-06 (ZG-B23090W):Serial monitor and AT commands
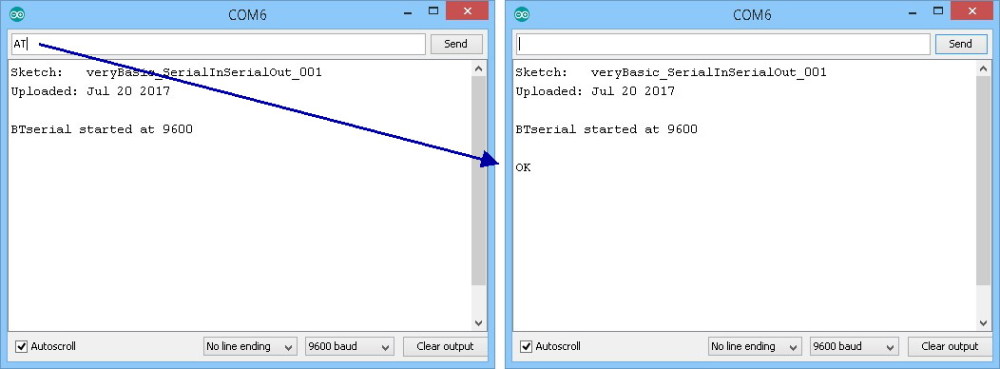
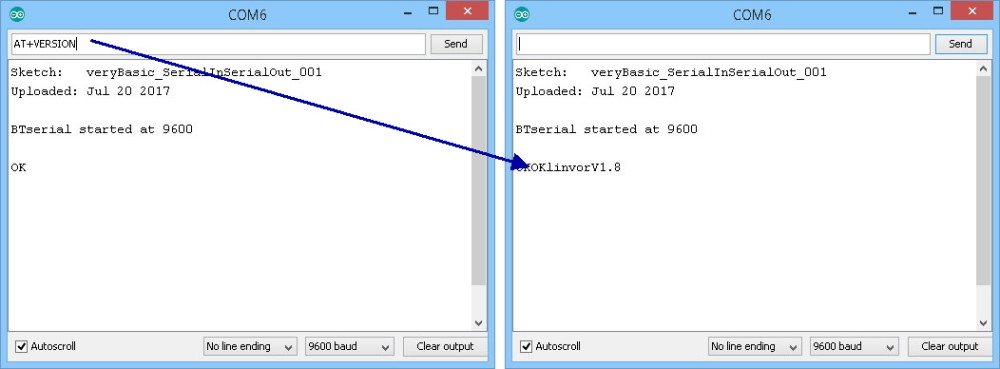
Make sure “No line Ending” and “9600” are selected at the bottom of the serial monitor
![]()
“AT” checks that serial communication is working
“AT+VERSION” gets the firmware version/ID
HC-06 (ZG-B23090W): Downloads
HC-06 B28090W Bluetooth module Data Sheet English
HC-06 B28090W Bluetooth module Data Sheet Chinese
Hi Martyn
I have knocked this very circuit up to reconfigure my HC-06 but it won’t get past the initial setup call… its outputs the ‘print’ lines to serial monitor but typing AT commands returns nothing… not sure what I have missed
Regards
Paul
Double check the connections and the resistor values.
Make sure you have no line endings selected.
What name does the module broadcast?
Broadcasting as HC-06 currently… I know the module works as is as I have just used the same one for the drop controller I built from your circuit diagrams (thanks btw, its a step up from my HiViz unit :) )
I double checked the voltage at the divder and was getting just over 3v so added an elegoo psu board and got it up to 3.3v…
The Arduino unit is a ‘copy’ one but its the same as the unit in my drop controller which works fine… the HC-06 module is a n other eBay one but again works fine in the drop controller I built..
Cheers
I presume the 2 are the same module?
Can you try swapping them.
It may also be worth while trying to connect to a Bluetooth terminal app. See https://www.martyncurrey.com/arduino-and-hc-06-zs-040/
Ok… problem resolved (kind of!) :)
Seems the cheap eBay units I bought do not respond at all to AT commands for whatever reason… so bought one from Amazon instead and this just works…
Shame that ‘copy’ units aren’t 100% a copy but there you go
Cheers
Hello!
I had the same problem with HC-06 clone with pushbutton pads what I got from China, it did not react on AT commands from Serial monitor with no line ending /9600 configuration. I changed Serial monitor configuration to Both NL & CR and at least AT and AT+VERSION commands now are working. Version is 3.0-20170609, probably Y2017 edition.
Hi. I have the same problema, you can help me?
Version: 3.0 20170609
Try adding a “=” and if that doesn’t work also add CR LF line endings
eg. AT+NAME=NewName
I recently bought some HC-06 modules. Five, in fact. three of them were of one type with no pads for a pushbutton. The boards had http://www.hc01.com written on the BT module. They were just fine. Behaved exactly as expected.
Two others were the same as each other, had no identifying marks on the module and did have pushbutton pads. These boards were already configured to work at 38400 baud. They advertise on BT at HC06 and connect just fine. However, nothing I could do would get them into command mode. Not combination of activity on the power and (I presume) command pin (34) had any effect. I have an Arduino sketch that tries to communicate at a list of available speeds. Not response to AT commands at all.
Although they work fine, they are no good to me if I cannot change the name.
So – the question is, have you come across boards that look like HC-06, advertise as HC06 but will not respond to AT commands?
I wouldn’t mind but none of theme were even the JY-MCU boars that I ordered. Since they were cheap from ebay, I still get three useable boards for a reasonable price but I would like to make the other two work.
It is very possible they have a different firmware. Try a combination of upper and lower case, with and without line end characters.
Pin 34 is only used for HC-05s. The HC-06 enters AT command mode at start up.
I have the same problem. I have two China HC-06 and it will not react to AT commands
The information on difference between HC-05 and HC-06 is not entirely correct. Here is more correct information:
HC-05 can be used in either Master or Slave role; AT+ROLE command is used to set the Master or Slave role. HC-05 has also relatively broad set of AT commands to inquire, set, start, or stop the connection. While connected, pulling PIN34 high switches from data to command mode. Turning HC-05 on with PIN34 high starts the module in Command mode at 38400 bps. With HC-05
HC-06 is factory-set to either Slave or Master (they are typically designated HC-06M and HC-06S). If not specified, than you are probably buying Master pre-set module usually has big white paint mark on the BC417 chip. AT command set is narrowed to bare essentials – baud rate, name, pin, and parity. Get one Master and one Slave, have them pair once, and they will pair automatically on power-on forever. Great to put into project and never need to touch again.
HC05 _requires_ CRLF (\r\n) along with the AT command. For example “AT\r\n” should return “OK”.
HC 06 _must not_ have any line ending, only the command. For example, “AT” should return “OK”.
I have a same BT module. Thanks fo your tutorial!