First part of a comprehensive look at the HM-10.
Everything you wanted to know and more.
Introduction
The HM-10 is a small 3.3v SMD Bluetooth 4.0 BLE module based on the TI CC2540 or CC2541 Bluetooth SOC (System On Chip). The HM-10 is made by Jinan Huamao Technology and is one of many Bluetooth devices they produce.
There are 4 versions of the HM-10. The differences are usb pads and a crystal.
1 – with usb pads and the additional crystal
2 – with usb pads without the extra crystal
3 – no usb pads but with the additional crystal
4 – no usb pads, no extra crystal.
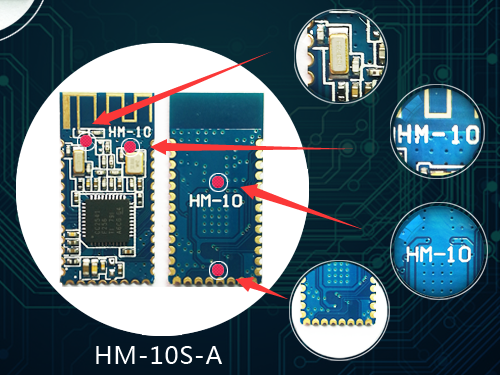
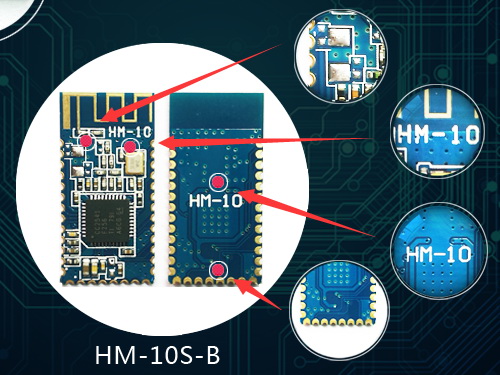
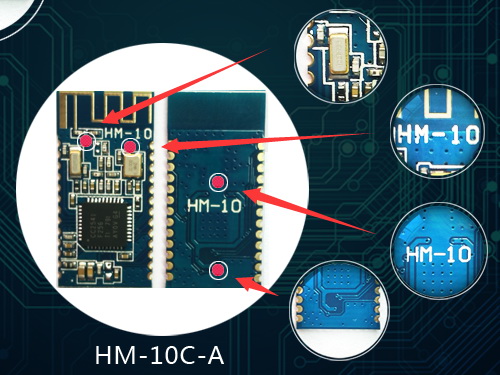
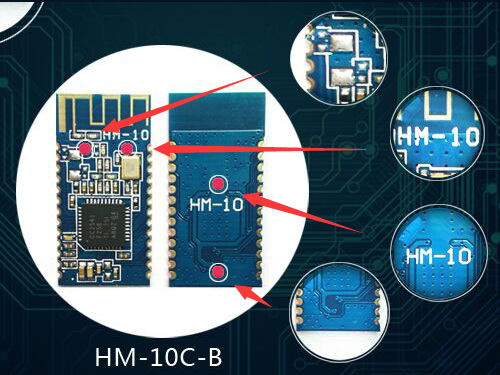
The HM-10C-A and HM-10C-B models do not have the pads along the bottom (the USB connections) and therefore, have 26 pads instead of 34 which makes it a little cheaper to produce. The B variant boards lack the external crystal, again making them a little bit cheaper. Operationally they are all the same.
HM-10 Basic specs
- Based on the CC2540 or the CC2541 chip
- +2.5v to +3.3v
- Requires up to 50mA
- Uses around 9mA when in an active state
- Use 50-200uA when asleep
- RF power: -23dbm, -6dbm, 0dbm, 6dbm
- Bluetooth version 4.0 BLE
- Default baud rate firmware before V700 is 9600
- Default baud rate firmware V700 and up is 115200
- Default PIN is 000000
- Default name is HMSoft
The latest HM-10s all appear to the the CC2541 chip. This is the same as the CC2540 except it is lower power and has a shorter range. The CC254x is based on the 8051 and runs at 32MHz.
The HM-10 is has become a very popular Bluetooth 4 BLE module for use with the Arduino. In part due to the standard UART serial connection that makes it fairly straight forward to connect to an Arduino. The UART layer is a good thing and a bad thing, it allows ease of use but it hides the BLE layer so you have no control over the actual BLE side of things. The HM-10 is Bluetooth version 4.0 only. This means it cannot connect to Bluetooth 2/2.1 modules such as the HC-06 and HC-05.
The HM-10 is controlled via AT commands which are sent over the serial UART connection. There are a host of commands, some simple, some more complex, and these are covered later.
Fakes
There are lots of comments on the internet about fake HM-10s and even Jinan Huamao includes information in the data sheets. I do not see the non-HM-10s as fakes, I see them as similar devices with different firmware. To me if they were fakes they would copy the firmware.
I think a lot of the problem comes from how the non-HM-10s are sold, especially on places like ebay and aliexpress. You will often see modules sold as HM-10s when they are in fact not. One of the easiest ways to spot the non-HM-10s was the lack of a crystal, unfortunately you can now buy actual HM-10s without the crystal so the confusion is likely to get worse.
HM-10 on a breakout board
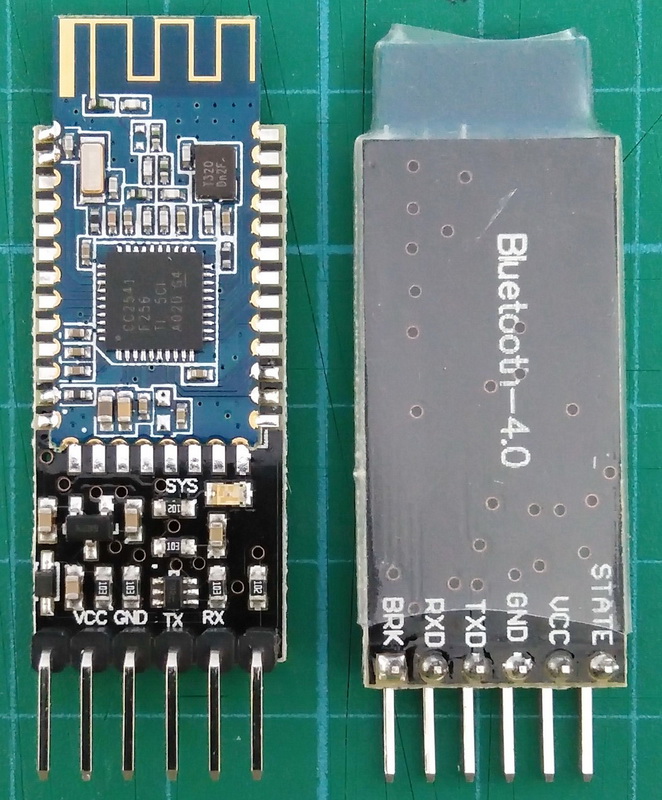
The HM-10 is available as a small SMD module and also available mounted to a breakout board that exposes the power and UART connections to breadboard friendly male pins. The breakout board includes a 3.3v power regulator that makes them 5V compatible. This makes them ideal for hobbyists like me. You should note that the RX pin is is still 3.3v and when using a 5v Arduino you should covert the Arduino’s 5v TX to 3.3v for the HM-10 RX.
| Pin | Description |
| STATE | Connection status LOW when not connected. HIGH when connected |
| VCC | Power in. 3.6v to 6v |
| GND | Common ground |
| TXD | Serial UART transmit |
| RXD | Serial UART receive |
| BRK | Break pin. When there is an active connection, bringing the BRK pin LOW breaks the connection |
On board LED
The on board LED blinks when waiting for connection. It blinks half a second on, half a second off.
The LED becomes solid on when a connection is made and returns to blinking when the connection is broken.
The LED changes to solid on when pairing. After pairing it returns to flashing. It basically makes a connection to pair and so turns on the LED to show the connection status. After pairing is completed the connection is closed and the LED is turned off.
The behavior of the LED can be changed using the PIO1 command.
“AT+PIO10” – Default setting. When not connected the LED blinks 500ms on, 500ms off. When connected the LED is solid on.
“AT+PIO11” – When not connected the LED is off. When connected the LED is solid on.
STATE Pin
The STATE pin is LOW when there is no connection and goes HIGH when a connections is established.
BRK Pin
The BRK pin allows you to cancel a connection. When there is an active connection, bringing the BRK pin momentarily LOW breaks the connection. When there is no connection making the BRK HIGH or LOW has no effect. Although not strictly required, pulling the BRK pin HIGH for normal use will stop the pin floating.
Jinan Huamao Technology Website
Website: http://www.jnhuamao.cn/index.asp
Main products page: http://www.jnhuamao.cn/bluetooth.asp
Firmware downloads: http://www.jnhuamao.cn/download_rom_en.asp?id=1#
Firmware release notes: http://www.jnhuamao.cn/index_en.asp?ID=1
Bluetooth 4 information pack
As well as firmware files, there are quite a few resources available on the Huamao website:
The information pack is available by clicking on one the HM-10 images on the Huamao website Bluetooth page. Jump to the website, click on one of the HM-10 images and download the zip archive.
You can also download from here.
The zip file contains the data sheet, instructions for the self leaning mode, and other useful notes. The datasheet in the dlownload is V610/V707 2020-02.
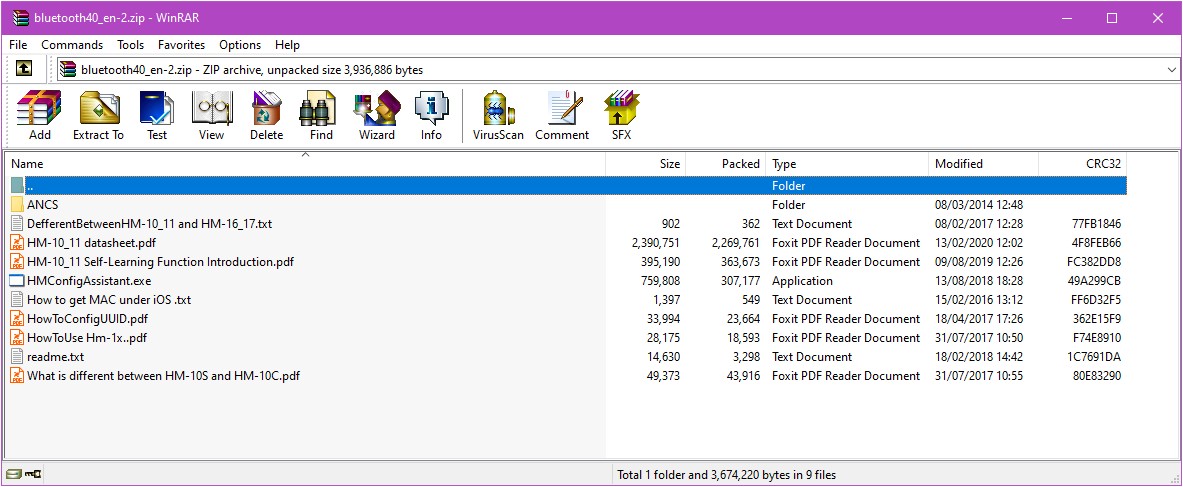
The data sheet in the download shows V610/V707 and is not fully up-to-date; it does not include the new AT+READOF command and has the old AT+CO command. It does include AT+PACK which was introduced in v702 though. Huamao version control looks to be as good as mine…..
The readme in the archive is not up-to-date either (goes up to V605). The readme that comes with the firmware download is better. The readme that comes with firmware V710 includes up to V709.
Firmware
The latest firmware is v710 (the download link says V710 but the folder inside the zip archive is named V709) and it can be downloaded from the download centre. Go here firmware download page and then click the Firmware Download link on the left hand side.
AT Mode default baud rates keep changing. These are the baud rates used to connect to the HM-10.
Firmware prior to V700 it is 9600.
Firmware V700 to V709 it is 115200.
V710 it looks like its back to 9600.
Here are the updates/changes since V700
V710
?
V709
-Add AT+Z1 AT+Z2 AT+Z3 AT+Z4 AT+Z5 AT+Z6 command.
Those commands is used to change full advertisiment package and ScanResponse package
Please use HM_Config_Assistant.exe to get AT commands list.
V708
-Add deep sleep mode
AT+IMME1 and AT+SLEEP (or AT+PWRM0), let module into 0.1uA deep sleep mode.
V707
-Modify AT+ADDR command
AT+ADDR command used to change module MAC.
Query command AT+ADDR?
Setup command AT+ADDR
P1: 12 Bytes, MAC string.
V706
-Add AT+UART command
AT+UART command used to switch UART wake function when module in sleep mode.
P1: 1 Byte, possible value ?, 0, 1
?: Query
0: Open UART wake function (default value)
1: Close UART wake function.
V705
-Add AT+READOF command
AT+READOF?, used to read long char value
P1: 2 Bytes, Start Index.
P2: 4 Bytes, Char Handle.
V704
-Modify AT+CO command
AT+CO[P3][P4][P5], used to make connection.
P1: 1 Byte, Devie type.
P2: 12 Bytes, Device MAC
P3: 4 Bytes, Notify Handle
P4: 4 Bytes, Write Handle
P5: 2 Bytes, Write property.
P1 and P2 must be input;
V703
-Add AT+INDICA_ON command
V702
-Made wakeup function better
-Add AT+PACK command used to modify data in Advertisement package.
AT+PACK[P1][P2][P3][P4][P5][P6]
P1, P2, P3, P4, P5, P6 length all is 2.
P1, P2, P3, P4, P5, P6 value 00~FF
V701
-Add AT+SET_WAY command
V700
-Default baud rate change to 115200
-Removed AT+ANCS command
-Removed AT+COMP command
-Removed AT+128B command
-Added new function used to support different brand BLE device
-Added AT+FINDSERVICES? command
-Added AT+FINDALLCHARS? command
-Added AT+NOTIFY_ON command
-Added AT+NTOIFYOFF command
-Added AT+READCHAR command
-Added AT+CHAR command
-Added AT+READDATA command
-Added AT+READDESC command
-Added AT+SEND_DATA command
Other changes include
– the default baud rate changed to 115200
– At Mode now accepts commands with and without line endings.
There were many reports of Android 8.1 not connecting to cheap BLE modules (inluding fake HM-10s), Jinan Huamao support say that the HM-10 (original ones, not copies) are compatible with Android 8. I do not have Android 8 so have not tried and cannot confirm. For a while there was a message on their website stating HM-10s were compatibly with Android 8 but it appears the News section no longer exists.
Firmware version 5.49 is available in two versions; regular and long name. The regular firmware does not have an updated read me so I don’t know what changes, if any, have been made. The long name firmware adds, you guessed it, long names. Device names can now be up to 29 characters. At the same time the iBeacon function and the ANCS function have been removed. This looks to be a one off (later firmware do not have a long name version and unless you desperately need long names I suggest you stay with the regular firmwares.
I always had issues using the HM-10 with other modules. I never got them to fully work with modules like the BT05 and the AT09. The BT05 & AT09 could receive data from the HM-10 but not the other way round.
I emailed Jinan Huamao a few times about this and didn’t get any replies but it looks like they at least addressed the problem and since firmware V700 there has been better compatibility with other BLE modules.
Bluetooth 4 BLE
BLE is not an upgrade to Bluetooth Classic, it is a different system with different intended uses. BLE works in a very different way to the earlier Bluetooth.
BLE is designed for low energy applications and achieves this by using infrequent small packets of data. It is not really designed for continuous connections and large amounts of data. For this, Bluetooth Classic is a better choice. In essence, BLE achieves its low power consumption by not being connected very often, unlike Bluetooth Classic which maintains a constant connection.
While you can create a classic style connection using 2 HM-10s, and I give an example below, they were not designed for this and if this is all you need then you would be better suited with Bluetooth Classic modules like the HC-05s or a HC-05 and a HC-06.
There are 2 ways BLE devices can talk to each other; Broadcaster + Observer, and, Central + Peripheral. The HM-10 can use both methods.
- With Broadcaster + Observer there isn’t a standard connection, the Broadcaster, usually some kind of sensor, sends out periodic signals (advertising packets) which the Observer listens for. The Broadcaster does not normally know if anything is listening or not.
- The Central + Peripheral scenario is more like (but not exactly the same) as the classic connection. When the Central (master) device finds a Peripheral (slave) device it wants to connect to it initiates a connection and takes on the master role managing the connection and timings.
HM-10 Services and Characteristics
BLE is all about services and characteristics and like all BLE devices, the HM-10 has a set of services and each service has a set of related characteristics. Characteristics are where the values are, some are READ, some are WRITE, and some are READ and WRITE.
All the services on the HM-10 are predefined except one. This is a custom service that has one custom characteristic. Predefined services and characteristics are ones where the UUID and the name are set by the Bluetooth governing body. For example, the characteristic 0x2A00 is the device name and when a device has this characteristic it should always be the device name.
A full list of the predefined services can be found here and a list of the characteristics is here.
The HM-10 uses the custom characteristic to send and receive the data it receives over the serial UART interface. It works by setting the value of the custom characteristic to the value of the data to be transmitted. It then sends out a notification to the remote device to say there is new data available.
When you tell the the HM-10 to transmit “HELLO”, it first sets the value of the custom characteristic to “HELLO” and then it sends out a notification telling the remote device “Hey, I have new data, come and get it.” The remote device is scanning for the notifications and when it receives one it knows there is a new value, so it reads the data and then sends back a message saying “Thanks, I have it”.
The custom characteristic can hold up to 20 characters, this means to send a string longer than 20 characters the HM-10 splits the data in to 20 character segments and sends each one in turn until none are left.
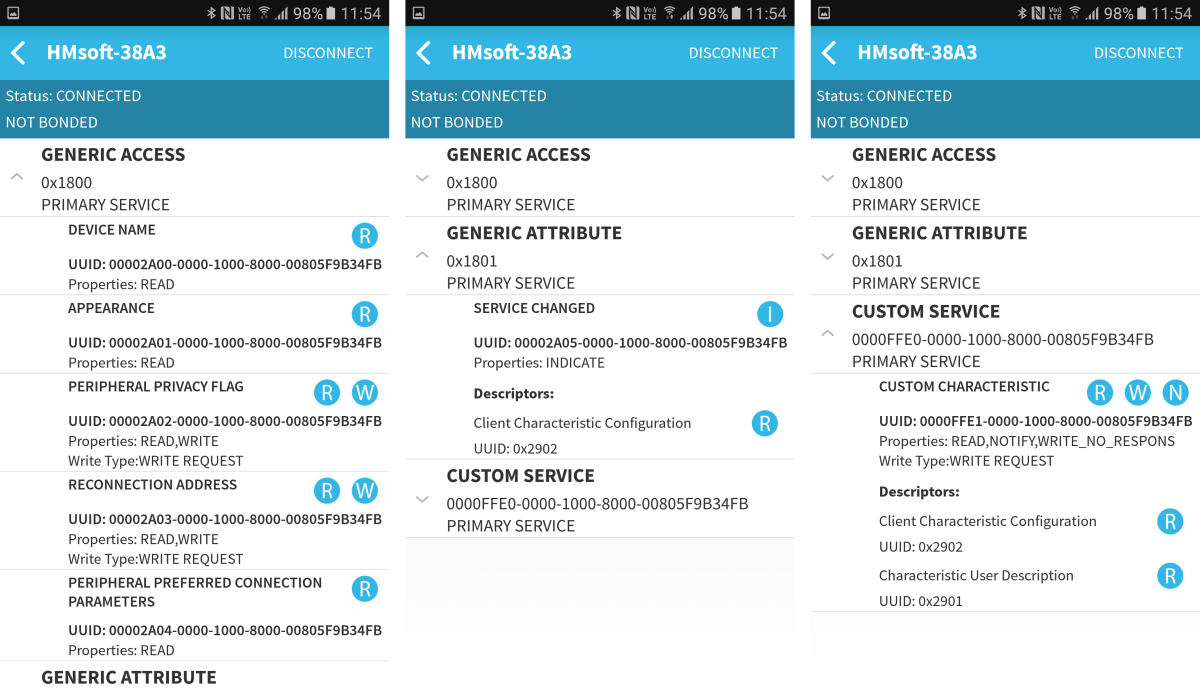
SERVICE 1
UUID: 00001800-0000-1000-8000-00805F9B34FB
GENERIC ACCESS
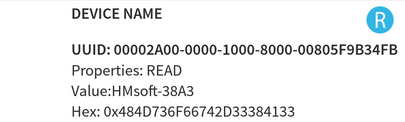
- UUID: 00002A00-0000-1000-8000-00805F9B34FB
- DEVICE NAME
- READ
- UUID: 00002A01-0000-1000-8000-00805F9B34FB
- APPEARANCE
- READ
- UUID: 00002A02-0000-1000-8000-00805F9B34FB
- PERIPHERAL PRIVACY FLAG
- READ/WRITE
- UUID: 00002A03-0000-1000-8000-00805F9B34FB
- RECONNECTION ADDRESS
- READ/WRITE
- UUID: 00002A04-0000-1000-8000-00805F9B34FB
- PERIPHERAL PREFERRED CONNECTION PARAMETERS
- READ
SERVICE 2
UUID: 00001801-0000-1000-8000-00805F9B34FB
GENERIC ATTRIBUTE
- UUID: 00002A05-0000-1000-8000-00805F9B34FB
- SERVICE CHANGED
- INDICATE
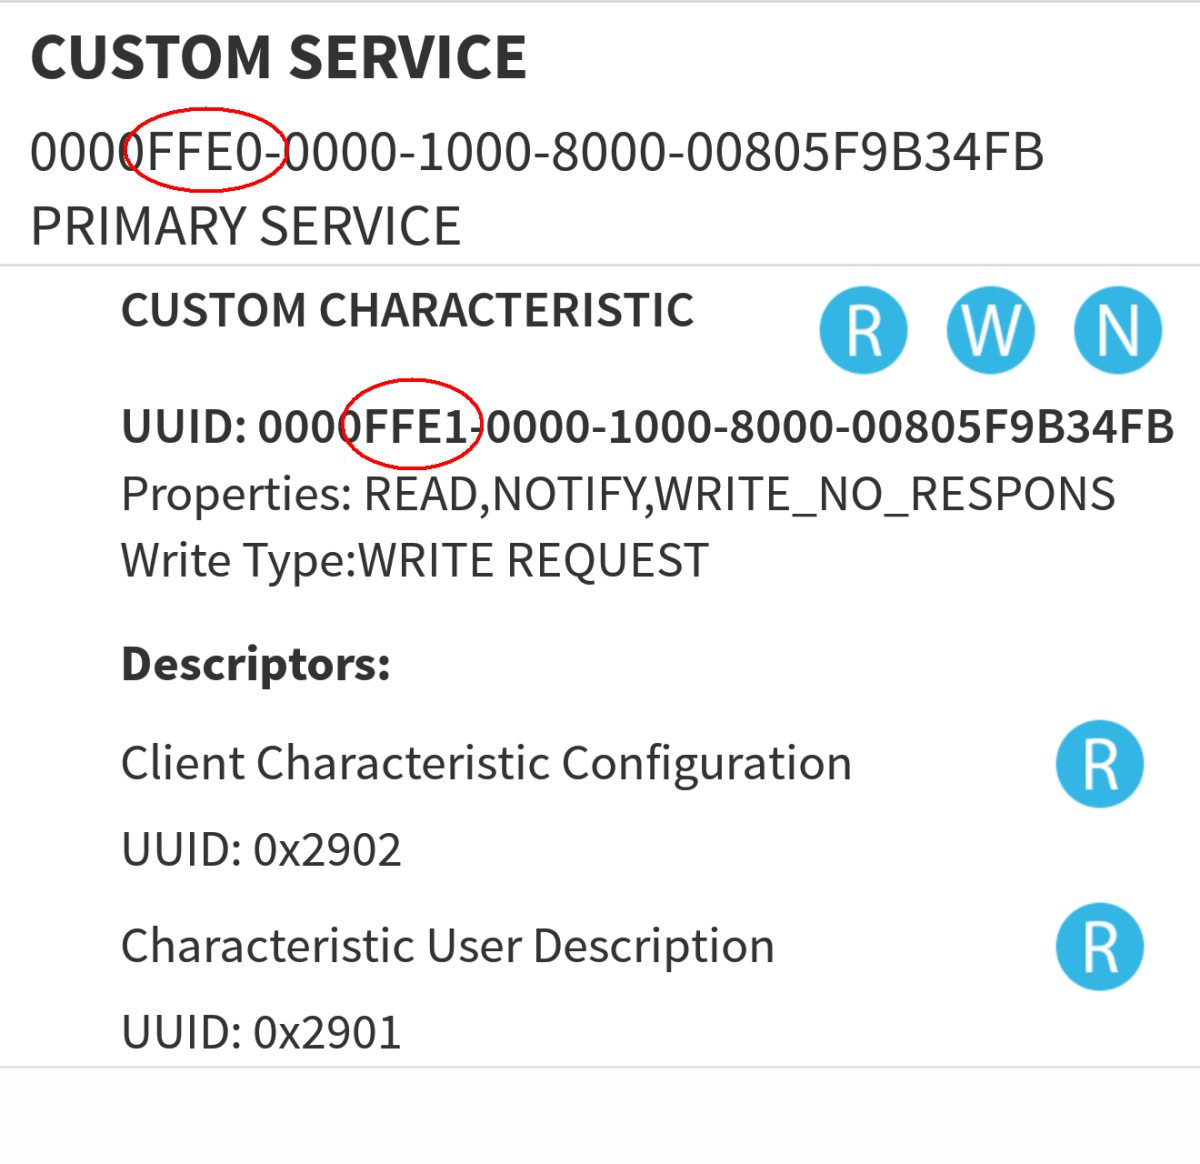
SERVICE 3
UUID: 0000FFE0-0000-1000-8000-00805F9B34FB
CUSTOM SERVICE
- UUID: 0000FFE1-0000-1000-8000-00805F9B34FB
- CUSTOM CHARACTERISTIC
- READ/WRITE/NOTIFY
The main part of the custom service UUID (FFE0) the main part of the custom characteristic UUID (FFE1) can be changed via AT commands.
A second characteristic can also be added.
You can see the services and characteristics in action using a BLE scanner app. lets give it a try
Get Started With The HM-10
First, lets use an Android device to scan for the HM-10. Then let’s try to read the services and characteristics from the HM-10. You can also use an IOS device but you will need to find a suitable BLE scanner app.
Power on the HM-10, you can use an Arduino for this or you can simply connect 5V to HM-10 VCC and GND to HM-10 GND.

If done correctly, the LED on the HM-10 should be flashing. When a connection is established the LED will be become solid on.
Checking The HM-10 With An Android Device
Depending on your Android device and the version of Android you are running the HM-10 may or may not show up when searching for Bluetooth devices under the Android Settings.
Samsung S9 with Android 10 – Finds the HM-10
Lenovo TAB-M8 tablet running Android 10 – Finds the Hm-10


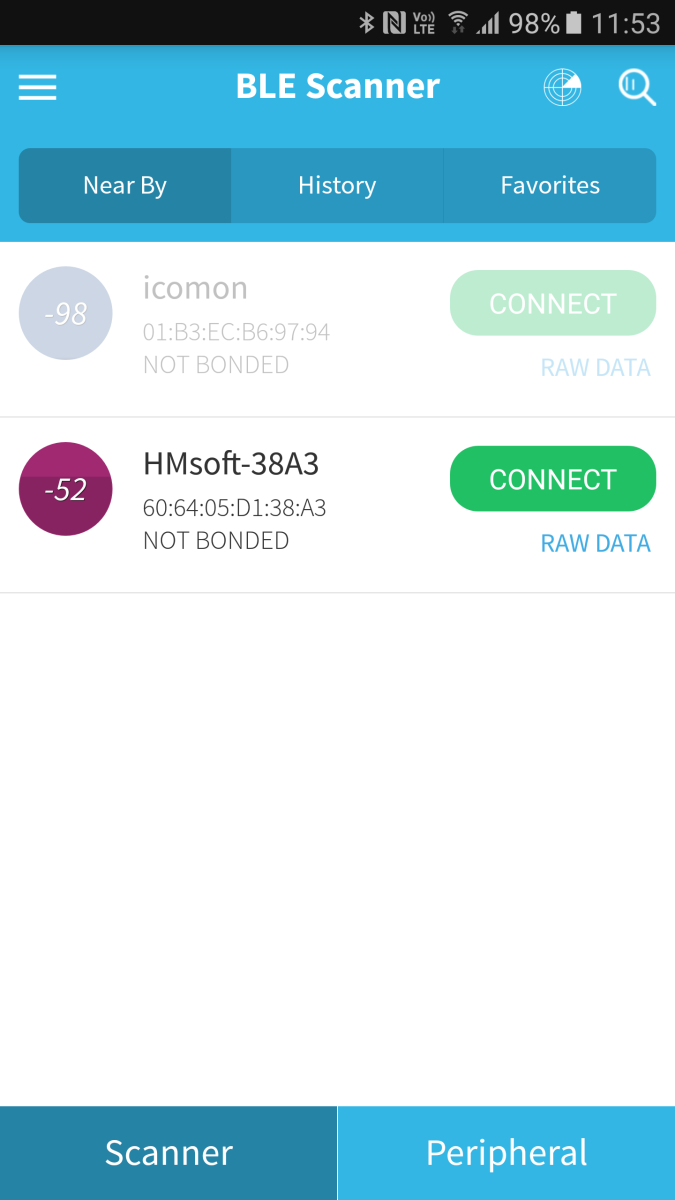
If you device does not find the HM-10 under Bluetooth settings, try using the BLE Scanner app.
To connect to the HM-10 and to read the services and characteristics we need to use a BLE app. Here I am using BLE Scanner. There are many other similar apps available such as B-BLE.
Reading the characteristics of the HM-10 using using BLE Scanner
Open the BLE Scanner app and find the HM-10. Tap the CONNECT button to get the app to connect to the HM-10 and start reading its properties.
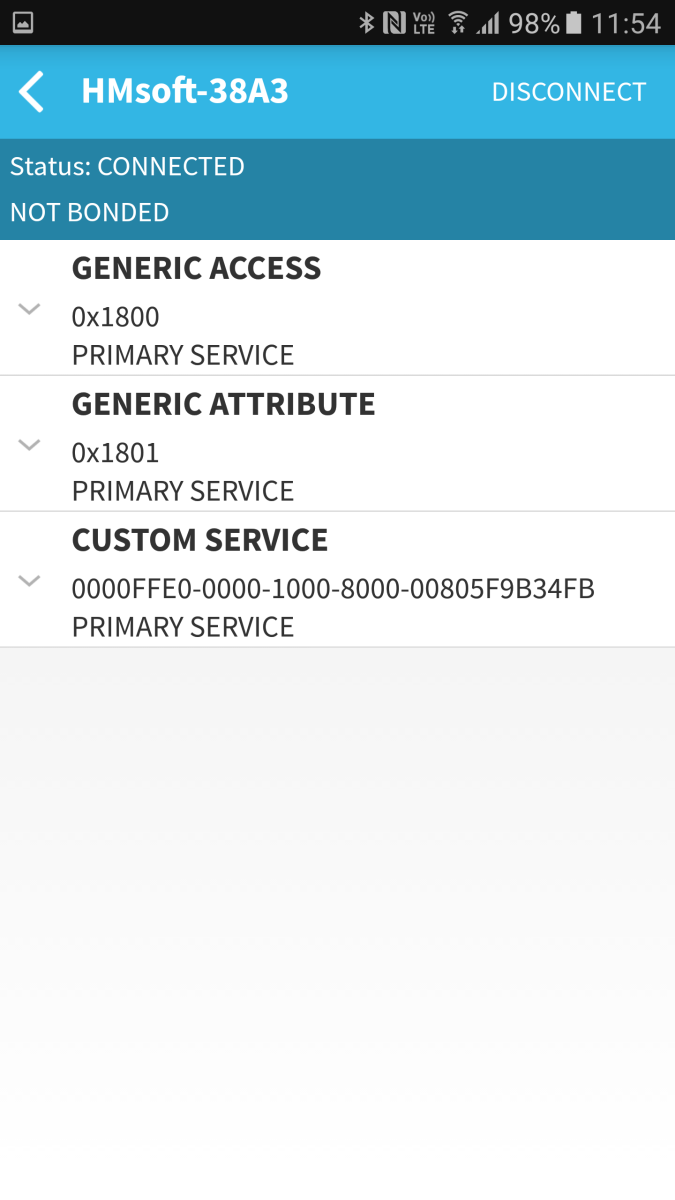
Clicking the small down arrows will expand the services and display the characteristics.
R = Read value
W = Write Value
I = Toggle indications on and off
N = Toggle notifications on and off
Tapping one of the ![]() labels will read the characteristic value. For example, under Device Name, tapping the
labels will read the characteristic value. For example, under Device Name, tapping the ![]() reads and then shows the device name value.
reads and then shows the device name value.
Under Custom Service you can see the HM-10s default service and characteristic values. You can also see that the HM-10s custom characteristic has Read, Write, and Notify attributes.
And that’s it. You are now ready for the next part, talking to the HM-10.
When will the rest be done?
If you mean the rest of the post, I don’t know. Sorry.
Hi, Im facing a problem dealing with these cc2541 based modules, maybe you can help me out. I would like to be able to know of the masters proximity from the slave device, with minimum power. How do you think I can accomplish this? What I was planing on doing was to get the module in master mode and scan for devices / compare with master MAC, but the FILT command was discontinued. Do you know why this happened? Cheers.
I somehow missed your question.
You can use the RSSI value to determine proximity but be aware the value is not standard throughout different manufacturers.
I am presuming you are using a HM-10 as the master device.
The AT+DISA? command returns the advertising information from found devices and includes the RSSI value. AT+ DISA? will find non HM-10 cc2540/1based modules like the AT09 and BT05.
The returned information is hex not ascii.
OK+DISA –> Search start
<OK+DISA:><Device Address><Device Type><Device RSSI><Rest data length><Rest data>
OK+DISE –> Search end
The AT+DISA? command requires fw 5.47 or above.
I have been meaning to add this to the above guide but have not found the time yet.
I haven’t been too motivated to use HM-10, but I wish I had known about this before……..
The best rundown on HM-10 that I have seen. Great.
hello
The device shows up at BT05 on my phone and when I try to pair with it I see nothing… I connected it ble scaneer app. but not connected with mobile phone…what is the matter for it
BT05 is a different module. I don’t have a full write up but an introduction can be found in Bluetooth Modules post https://www.martyncurrey.com/bluetooth-modules/
hi martyn
i have same problem with HM 10 . the device shows up on my phone but i can’t pair with it
Hello,
Thanks for making this big tutorial about hm10, It is helpfull.
I’m currently struggling with a functionnality I don’t succeeded in doing with HM 10; I would like to read characteristics from a distant devices throught HM10 (a mi flora).
Communication diagram:
ESP8266 HM10 Mi flora
Communication between ESP8266 and HM 10 is OK and working well.
I would like to read the temperature/moisture … , the corresponding characteristics can be found on existing python scripts working with BLE dongles or integrated BLE chips:
https://github.com/open-homeautomation/miflora/blob/master/miflora/miflora_poller.py
With HM 10 I’m not able to read the data from the xiaomi miflora. Here what I have done:
-Discover the Mi flora with the AT+DISI? command and recover the adress–>OK
-connect to the Mi flora adress in master mode with AT+CON –>OK
I get an OK+CONNA and after 3 carriage return, nothing happens after…
I tried after to question characteristic but it returns only the HM 10 characteristic.
I tried to put the HM 10 in slave mode but the connection to the mi flora fail.
I’m using HMSoft V545
Do you think it is possible to recover data from the miflora, if yes do you have some infos to give me?
You need to update the firmware and then use DISI or DISA or maybe both (can’t remember which).
I think both commands return hex values not ascii so you cannot simply print the reply. Check the data sheets for details.
Great I updated to V601 and I can confirm that AT+DISA? return me hex values. I’m studying the return. Thanks!
Have you reached any result about return values? they seems very diffucult.
Hi martyn I have an issue connecting hexiwear to HM-10 since the hexiwear requires me to provide pairing code in to my HM-10 module. What are the other possible ways i could connect my hexiwear to an arduino using BLE module(since HM-10 doesn’t have the feature of asking for PIN which you mentioned in oneof the commands above).
I haven’t used the hexiwear but if the hexiwear has a fixed passcode set the HM-10’s code to match and it may handle the pairing automatically.
A good document Martin and I intend to put it to good use.
I’d like to order some HC-10s who do you recommend as a good supplier please
I don’t have a recommended supplier. I have asked Jinan Huamao a couple of times and they never replied.
I ordered a couple of them rrom amazon, manufactured by dsd tech. Happy with the purchase :)
Dani
Hey I also purchased a DSD tech HM10 and can’t seem to get any AT responses. could you go into detail with which one you bought and how you set it up?
I can’t tell if the DSD version is an official HM-10 or not. The data sheet they link to is a rebranded HM-10 data sheet for fw V545 (https://drive.google.com/file/d/1XJQznN6fPFQqAoTVqZh06vhbJ7eF0VFu/view)
On page 10 they give the default UART settings:
Factory default setting:
Name: HMSoft; Baud: 9600, N, 8, 1; Pin code: 000000; Peripheral Role; transmit mode.
AT Command format:
Uppercase AT command format. string format, without any other symbol. (e.g. \r or \n).
Very good tutorial. Good work.
can you please tell me how it operates on 3.3V but VCC needs to be 5V inout, cant we just use 3.3v output of boards like arduino pro mini 3.3v
Yes, you can use 3.3v output of arduino for Vin of Hm-10.
(tesekkurler) thanks, just another quick question, do you mean that I can use hm10 with a arduino running 3.3v (actually powered by 3.7v battery) without V divider on RX pin ?
evet, HM-10’in Vcc pinini arduino’nun 3.3V çıkışına bağlayabilirsin voltage divider’a ihtiyaç olmadan.
yes you can directly connect Vcc pin of HM-10 to 3.3V out of arduino uno without need any voltage divider.
RX-TX pinini doğrudan bağlayabilirsiniz eğerki Vcc pinini 3.3V ile besliyorsan.
turk musunuz bilemedigim icin basa ipucu babinda yazmistim, cok tesekkurler bilgiler icin arduino pro mini 3.3v clone’u alip 3.7 v pil ile besleyecegim regulator var diyorlar o yuzden vcc 3.3v’e regule olur diye umuyordum insallah calisir, haber ederim, tekrar tesekkurler
3.3’e regule olur bencede. her hangi bir V çıkışıda 3.3 çıkışına sahip olur. direkt bağla gitsin.
kolay gelsin.
The actual HM-10 is a 3.3v device. This is the small board. See the very first images above.
The larger HM-10 is a HM-10 on a breakout board. The breakout board has a 5v to 3.3v convertor allowing 5V to be used.
To use 3.3v, find the VCC pin on the small board and connect to the 3.3v out of the Arduino.
Tldr: Texas Instrument’s documentation on CC2541 tells how to enable/disable encryption. Jnhuamao doc’s for HM-10 tells that it’s there, but as with all cheap electonic’s datasheets: It doesn’t mean it has been applied on practice at all and if it’s still secure considering todays requirements, since few vulnerabilities have been found on ble 4.0 since it’s release.
Thanks for the very helpful page! I thought I would list a couple of issues and work arounds I had when working with hm-10 or variants.
The main issue was that I understood that I needed to manually pair the ble module in android before I could connect to it in an app. I found that I do not need to pair when TYPE is set to 0 (not need pin code). The other issue I had was that I was not aware that most of the bluetooth terminal apps on android do not support ble and would fail to connect. I think that most users who use the Hm-10 or alternative parts come from using hc-05/06 devices which are used very differently to properly pair and connect to.
Also I got a response for huamo about who they recommend for supplier. They suggest using: http://www.szhenghongtong.en.alibaba.com
supplier: szhenghongtong on alibaba.
Thanks again!
Thank you for letting everybody know.
It looks like Heng Hong carry the full range of modules but only the SMD boards.
That must be the most comprehensive HM10 overview on the internet …. Excellent job man !!
Hi,..
HM-10 Bluetooth device what type of class.
Version 4.0, but class ?
I can’t find a class but the the RF Power is : -23dbm, -6dbm, 0dbm, and 6dbm
Truly excellent article!
Detailed and specific. The only useable information I have found on using the HM-10 in central/master mode.
Thanks for all your hard work.
Great article! Thank you!
Hi Martyn,
Top most article you mention 4 hm-10 variants, 2 having USB pads.
Do you know any application using the USB pads?
Is it functioning as actual USB (firmware emulation)
I haven’t found any so far.
Unfortunately the USB functions are not implemented in the HM-10 firmware. To make use of them you would need to program the TI CC2540 directly.
thanks for the insight, appreciate it.
I have built a device that communicates with an iPhone, using the BLE module HM-10. I wish to speed up the rate of data exchange between the two units. Can I do this by using AT commands?
Unfortunately you cannot change the wireless communication speed. This handled by the Bluetooth functions in the firmware. The only spped you can change is the UART buad rate used for the HM-10 to communicate with the device it is physically connected to.
Hello,
I purchased a Genuine HM-10 and am having difficulties with self-learning functions. I am running the latest firmware
So, here is all Services of the device I am connecting to
ALL Services
**********************************************************
0001:0007:1800
0008:000F:00010203-0405-0607-0809-0A0B0C0D1910
0011:0019:F000FFC0-0451-4000-B000-000000000000
**********************************************************
All Characteristics
**********************************************************
0003:–|WR|–|–|–:2A00
0005:RD|–|–|–|–:2A01
0007:RD|–|–|–|–:2A04
000A:RD|–|–|NO|–:00010203-0405-0607-0809-0A0B0C0D2B10
000E:RD|–|WN|–|–:00010203-0405-0607-0809-0A0B0C0D2B11
0013:–|WR|WN|NO|–:F000FFC1-0451-4000-B000-000000000000
0017:–|WR|WN|NO|–:F000FFC2-0451-4000-B000-000000000000
********************************************************
I then use the following AT commands
AT+CON9C04A015D800
AT+READDATA000A?
AT+NOTIFY_ON000A
AT+SET_WAYWN000E
I can read data but I cannot write. Any help is appreciated, thank you!
thank you its very helpful
Hello, A few years ago, I built a garage door opening mechanism from an Arduino Nano, classic Bluetooth (HM-05) and a basic relay.
I wrote an Android app which would pair & bond to the HM-05 using passcode. I discovered the HM-05 device would store at least 3 secrets for 3 different phones, which meant I could allow whole family to use garage door opener via their own phone.
Now, all these years later my entire family & I have iPhones which only use BLE. I switched up my device and added an HM-18 (https://amzn.to/3v8BhiC amazon link) which does support iOS & will pair & bond, but unfortunately will only save one secret at a time. As soon as it pairs/bonds with another phone then it removes the secret for the other phone.
I don’t know how I got so lucky with those original HM-05s that they worked with multiple phones, but now I am wondering if you know of :
1) Any device which will a) pair / bond with iOS device & b) will allow multiple iOS devices to pair / bond?
2) any way to force the HM-18 to store multiple secrets? — solder a jumper or something?
Thanks for any help you may provide.
Where can I buy v707 HM-10S-A?
There are so many fake version on the market. I try to contact webmaster@jnhuamao.cn
I am unable to contact them.
Do you have any suggestion?
Thank you for your help
Hi,
I haven’t looked at your stuff for ages, and maintained that the HM-10 was more trouble than it is worth. I now see that you have hugely expanded this site and I assume that this is because HM-10 has been upgraded in firmware over the years and is now a viable proposition, so it is time for me to change my mind about this….
So, do I understand correctly that the HM-10 is now a viable drop-in replacement for the HC-05? I ask this particularly because not only should it be time to progress, but also because I don’t hear complaints about fake and/or dud HM-10s.
I also note that you use AltSoftSerial. Is there any magic therein that is particularly relevant to the HM-10?
Thank you
The main update to the HM-10 was the self learning mode. This is used to scan services and characteristics from other devices. Prior to this it was difficult to use the HM-10 with non-HM modules.
The HM-10 can replace the HC -05 but, depending on how it is used, may not be straight forward.
The HM-10 is BLE and the HC series are Bluetooth Classic/2.0 EDR. If you are using them using them in pairs via UART then either version works pretty much the same.
If you are using them with mobile devices then there are some big differences. The HC series is Android only and the HM-10 is Android or IOS. BT Classic is still better for some uses, such as high volume data, but I now prefer BLE because of how it connects to devices. BT Classic requires pairing and authorizing on the device before using an app whereas BLE can be controlled entire within an app. This makes BLE a better user experience.
Having said all that, I haven’t done anything new with Bluetooth for a while. I have moved on to ESP32s and ESP8266s and web apps.
Hi Martyn, I’m trying to interface with a peripheral device which expects an 8 byte request, and responds (through a notify characteristic) with a 50 byte response. I only get 20 bytes back, so it seems like the 20 byte write limit applies to reads as well, but the data is not split, it’s lost :(
Anyway, moving to esp32wArduino, thanks for the guide :)