Have a HM-10 and want a chat with it? You need to know what to say and how to say it. Let’s try talking to a HM-10 with some of the more common AT commands
Note: AT commands only work when the HM-10 is not connected to another wireless device. After a connection is made the commands are treated as data. AT is the exception, AT breaks the connection.
This guide assumes you have a HM-10 with a firmware that has 9600 baud rate.
This guide uses an Arduino with software serial to communicate with a HM-10. Software serial is very limited in what baud rates it can handle and has has a workable maximum of around 34800 baud rate on 16MHz Arduinos like the Nano I am using, even then it’s only reliable if the Arduino isn’t doing much else.
The HM-10 uses different default baud rates depending on the firmware it has.
Firmware up to V699 is 9600
Firmware V700 – V709 is 115200
Firmware V710 is back to 9600
For HM-10s with firmware V700 to V709 you will need a USB to serial UART adapter or a faster Arduino. A 16MHz Arduino running software serial ain’t going to cut it.
Circuit
First set up an Arduino and HM-10.
– Arduino D2 (software serial RX) to HM-10 TX pin
– Arduino D3 (software serial TX) to HM-10 RX pin via a voltage divider
– GND to GND
– +5 to HM-10 VCC
*The pins on the actual HM-10 (the small daughter board) are 3.3v only. They are not officially 5v tolerant so use a voltage divider or something else to bring the voltage down to 3.3v.


The HM-10 is a 3.3v device. The breakout board converts the +5v vcc to 3.3v to power the HM-10 but the RX pin is still 3.3v. Therefore, we need to bring down the Arduino 5V TX pin to 3.3V. A simple way to do this is by using a voltage divider made from 2 resistors. I use a 1k ohm resistor and a 2k ohm resistor.
The Arduino will see the 3.3v signal from the HM-10 TX pin as HIGH so we can connect the HM-10 TX pin directly to the Arduino RX pin (D8).
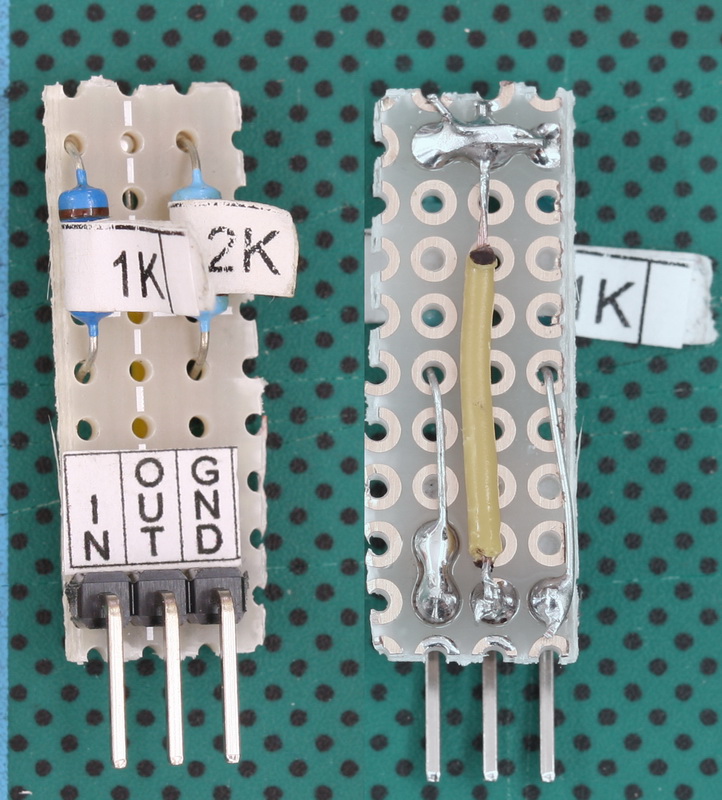
I am using a premade voltage divider.
I make a lot of this kind of breadboard circuit and I made many small breadboard modules. One of these is a voltage divider.
Serial Sketch
After building the circuit upload the following sketch. This is a simple serial in, serial out program. Whatever the Arduino receives from the serial monitor it relays to the HM-10. What ever it receives from the HM-10 it copies to the serial monitor.
I am using a HM-10 with V710 firmware. This uses a 9600 baud rate and doesn’t care if you use line end characters (/n/r) or not. If you add line end characters so will the HM-10, if you don’t, then it wont.
The below sketch was written for the older HM-10 firmwares and manages line endings for me, so although I am adding them in the serial monitor, they are not being sent to the HM-10. The sketch prints the characters in the serial monitor it does not send them to the HM-10. This helps make the examples easier to read.
/*
 *  sketch: SerialPassThrough_SoftwareSerial_NL
 *  www.martyncurrey.com
 *
 *  Use software serial to talk to serial/UART connected device
 *  What ever is entered in the serial monitor is sent to the connected device
 *  Anything received from the connected device is copied to the serial monitor
*  User input is echo'd to the serial monitor
 *
 *  Pins
 *  BT VCC to Arduino 5V out.
 *  BT GND to GND
 *  Arduino D2 (Arduino RX)
 *  Arduino D3 (Arduino TX)
 *
 *  Assumes a 5V Arduino is being used
 *  If the connected device is 3.3v add a voltage divider (5v to 3.3v) between Arduino TX and device RX
 *  Arduino RX to device TX does not need a voltage divider. The Arduino will see 3.3v as high
 *
 */

#include <SoftwareSerial.h>
SoftwareSerial softSerial(2, 3); // RX, TX

char c=' ';
boolean NL = true;

void setup()
{
    Serial.begin(9600);
    Serial.print("Sketch:   ");   Serial.println(__FILE__);
    Serial.print("Uploaded: ");   Serial.println(__DATE__);

    softSerial.begin(9600);
    Serial.println("softSerial started at 9600");

    Serial.println("Set line endings to 'Both NL & CR'");
}

void loop()
{
    // Read from the UART module and send to the Serial Monitor
    if (softSerial.available())
    {
        c = softSerial.read();
        Serial.write(c);
    }

    // Read from the Serial Monitor and send to the UART module
    if (Serial.available())
    {
        c = Serial.read();

        // do not send line end characters to the HM-10
        if (c!=10 & c!=13 ) {   softSerial.write(c); }

        // Echo the user input to the main window.
        // If there is a new line print the ">" character.
        if (NL) { Serial.print("\r\n>");  NL = false; }
        Serial.write(c);
        if (c==10) { NL = true; }
    }

} // void loop()
Upload the sketch and open the serial monitor and you should see something similar to:

The HM-10 requires commands to be in upper case and, depending on the firmware version, normally without line end characters added.
Here the sketch takes care of the line end characters for us. It does not send them to the Bluetooth module but will print them when echoing the command to the serial monitor main window. This is not really required but it means the commands will be on individual lines and be easier to read in the following examples. Normally, when working with the HM-10, everything is printed on one line.
Remember when using other sketches or a USB to serial UART adapter to set line endings to “No line ending” at the bottom of the serial monitor.
At the bottom of the serial monitor, set the baud rate to either 9600 or 115200* and using the above sketch means we can have line end characters selected:![]()
* 115200 will not work with a 16MHz Arduino running software serial.
Firmware before V700 uses 9600
Firmware V700 to V709 uses 115200
Firmware V710 appears to use 9600 again.
To see if the connections are correct we can use the “AT” command.
The “AT” command is used to confirm communication is working and all it does is return an “OK”.
“AT” can also be used to break an active connection.
Enter “AT” (no quotes) in the text box and click Send. If everything is working you should see “OK”.


To check what firmware the HM-10 has, use AT+VERR? or AT+VERS?


To check the modules name use AT+NAME?, or use an Android device and search for Bluetooth devices.
The default name is HMsoft.
The name can be changed using the same command. See below.


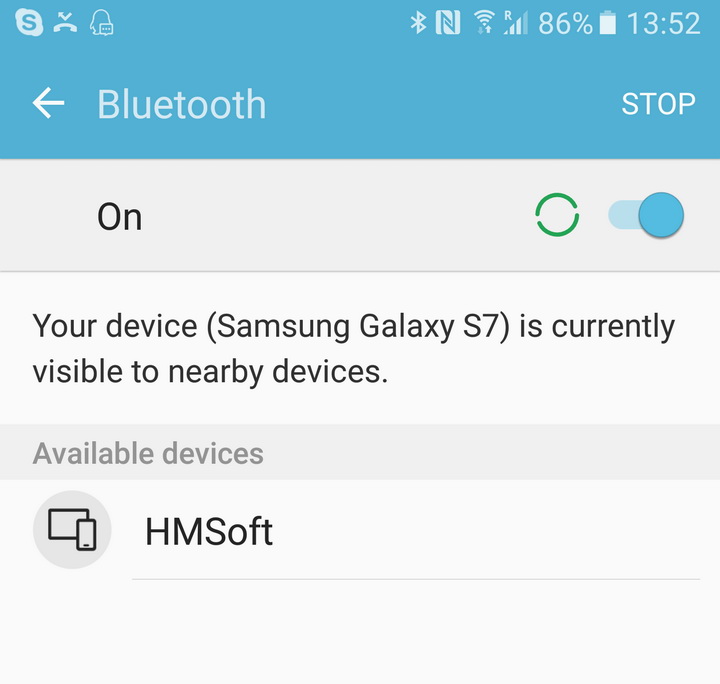
Connect the HM-10 to power and use a mobile device to scan for Bluetooth devices
This only works when the HM-10 is in Salve/Peripheral mode. When in Master/Central mode it does not broadcast its name.
To get the modules mac address, use AT+ADDR?


Change the name using AT+NAME.
Later I will be using 2 HM-10s and changing the names will help identify which is which. As you can see from the below I have changed the name to HM10-5221 The “5221” is the last 4 digits of the mac address.
Change the name using AT+NAMEHM10-5221


If you use AT+NAME? to check, the HM-10 will report the new name, however, it does not change the name being broadcast until after a reset or power cycle.
To get the modules Bluetooth characteristic, either use AT+CHAR? or use a BLE scanner app.


For more details about the HM-10’s services and characteristics jump to the HM-10 Introduction post.
To find the UUID use AT+UUID? This returns OK+Get:0xFFE0.


Common AT commands
Here is a list of the main AT commands. Remember that commands should be in uppercase. Line endings depend on the firmware the HM-10 has.
| AT | Test Command or Disconnect Command | If the module is not connected to a remote device it will reply: “OK” If the module has a connection then the connection will be closed. If the notification setting is active, the module will reply with “OK+LOST” |
| AT+NAME? | Query the name | Returns the name the module broadcasts such as HMsoft. |
| AT+NAMEnewname | Change the name of the module | Changes the name broadcast by the module. For example AT+NAMEmyBTmodule changes the name to myBTmodule. The maximum length for a new name is 12 characters. |
| AT+ADDR? | Queries the HM-10s mac address | Returns the address as a 12 digit hexidecimal number. For example, OK+ADDR:606405D138A3 |
| AT+VERS? AT+VERR? | Queries the firmware version number | For example: HMSoft V540 |
| AT+RESET | Restarts the module. | Returns OK+RESET Will close an active connection while restarting. |
| AT+RENEW | Restores the default factory settings. | A quick and easy way to reset all settings. |
| AT+BAUD? | Query the baud rate used for UART serial communication. This is the speed a host device like an Arduino uses to talk to the BT module. It is not the the speed used to send wireless signals between different modules. | Returns the value 0-8, for example, OK+Get:0 0 – 9600 1 – 19200 2 – 38400 3 – 57600 4 – 115200 5 – 4800 6 – 2400 7 – 1200 8 – 230400 The default setting is 0 – 9600. Remember that both devices, the Arduino and the HM-10 need to use the same baud rate. Garbage characters are usually a sign of mismatched baud rates. |
| AT+BAUDx | Set the baud rate used for UART serial communication. | x is a value from 0 to 8. See the above for wwhat value represents which baud rate. Take care when using with an Arduino. The maximum baud rate the Arduino serial monitor allows is 115200. If you set the baud rate to 230400 with AT+BAUD8 you wont be able to talk to the module. |
| AT+NOTI | Set the notification status | If notifications are turned on, the HM-10 will reply to commands with a confirmation message or send out a message when certain events take place, like “OK” for the AT command and “OK+LOST” when a connection is broken. |
AT+NOTI0 – turn off notifications
AT+NOTI1 – turn on notifications
AT+NOTI? Query the notification status. Returns either 0 or 1:
0 – notifications are off
1 – notifications are on
AT+PASS? – Query the password used for pairing.Replies with a 6 digit number like “OK+Get:123456” or whatever the current password is.
AT+PASS – Set a new password.The password must be 6 characters long..
AT+PASS123456 – Sets the new password to 123456
AT+ROLE? – Query the current Role; Master or Slave
AT+ROLE? returns either 0 or 1.
– 0 = Slave or Peripheral
– 1 = Master or Central.
The default setting is 0 (Slave).
AT+ROLEx – Set the device role. x is 0 or 1.
– To change to Slave/Peripheral mode use AT+ROLE0. This will return OK+Set:0
– To change to Master/Central mode use AT+ROLE1. This will return OK+Set:1
AT+ROLEx may require a reset (depends on the firmware version) before the changes take place.
AT+IMME? – Query the start mode
AT+IMME? returns either 0 or 1.
– 0 = Connect immediately (assuming a previous connection has been applied
– 1 = Wait for a connection command before connecting (AT+START, AT+CONN, AT+CONL)
The default setting is 0 (connect on start).
AT+IMMEx – Set the start up mode
– AT+IMME0 sets auto connect on start*
– AT+IMME1 sets manual connection mode
AT+IMMEx is often used together with AT+ROLEx
AT+IMMEx may require a reset before the changes take place.
AT+RESET restarts the module
AT+RENEW resets the module to the factory settings
*If there are no previous connections, HM-10s will auto-connect to any other HM-10 available (normally the one with the strongest signal). The HM-10 (by default) remembers the address of the last module it was connected to and if there is stored a previous connection this will take priority when the HM-10 is retrying to auto-connect.
For a full list of AT commands see datasheet V610/V707 2020-02.
Im trying to run this hm10 module on the MEGA. Im using Serial1 as the bluetooth serial as I have connected it to pins 18/19 using the divider. Serial is my monitor which runs off pins 0/1, right? But I enter AT command into the serial monitor and I just get >AT printed out.
the >AT is echoed back from the Arduino, it is not the response from the HM-10.
Yes, pins 0+1 are used for the serial channel to the computer. This is the main hardware serial channel.
First thing to do is double check the connections. Then check them again. After this I would try using software serial or AltSoftSerial with different pins. This means you can use the sketch without changing it. If this works go back to the hardware serial.
I am having exactly the same problem, i can’t manage to receive an answer for the “AT” command. Something curious is that if WRITE from my phone to the module, i can see what i wrote in the Serial Monitor, but it doesn’t work from the Monitor to the phone (using BLE scanner app).
If i do the same with a HC-06 module everything works just great!
This means HM-10 to Arduino is OK but you have a problem with Arduino to HM-10.
I know you have the HM-06 working but it is worth double checking everting again. Make sure the voltage divider is connected correctly.
As a test you can place an LED (+resistor) on the Arduino TX pin and see if it blinks when to send data.
No blink means something wrong with the code.
Blinks mean something wrong with the connection between Arduino TX and HM-10 RX
Thank you Martyn, my problem was with the voltage divider for the RX pin of the module. I wasn’t giving the pin enough voltage to represent a logic ‘1’
I was having some doubts about your suggestion to add a voltage divider to the RX pin, so I did some research. Hard to find a solid answer, but I did find an interesting discussion in the Arduino forums about a similar issue with another module. Paul__B suggests that using a diode might work even better than resistors (but clearly you are correct that resistors will likely get the job done).
The electronics details are beyond my understanding, but just for the record, here’s a link of the discussion: https://forum.arduino.cc/index.php?topic=385000.msg2653978#msg2653978
I have been connecting my arduino pins directly to the HM-10 breakout RX with no bad results to date, but as someone mentioned, that doesn’t prove that what I am doing is correct! :-)
The spec for the CC254x chip used in the HM-10 clearly states it is a 3.3v device.
Some time ago there were similar discussions about the HC-05 and HC-06. The specs stated the chips were 3.3v but people reported using 5V without problem. Other people report problems. I did some TTFs on 3 HC-05s by connecting the RX pin directly to 5V and then ran a a serial send in a loop. The RX pin on all the HC-05s eventually died. Since then I have always advocated better to be safe than sorry.
There are many ways to reduce the voltage, I use resistors because I have them and they are very common. I have used diodes and also power regulators but prefer resistors.
Diodes will also work, and I believe they react quicker than resistors, as long as you know the voltage drop, the 4001/4007 are usually (but not always) about 0.7v so 2 in series works (5v – 1.4v = 3.6v. 3.6 is just about OK). At least with resistors you can calculate and achieve exact voltages and resistors tend to be far more common in a hobbyist parts bin.
I recently purchased the HM-18 module, the Bluetooth 5.0 version of the HM-10. While using your ATCommands sketch with my arduino, I changed the default Baud rate to 0 (9600). Now I cannot reestablish a link in the sketch. I know the module is still working, and advertising, but I can no longer communicate with it via the arduino. Are you familiar with this and do you have any advice?