I mentioned in the HM-10 introduction that BLE is all about services and characteristics and the HM-10 works by setting the value of a custom characteristic to match the value of the data being transmitted or received. This can be seen when using the BLE Scanner app and an Arduino and the Arduino IDE.
This guide assumes you are using a HM-10 that has a firmware that uses 9600 baud rate. If yours is 115200 then update to V710. V710 goes back to 9600.
BLE Scanner App
I am using BLE Scanner BLE Scanner (Connect & Notify) by Bluepixel Technologies. This includes in app purchases but you don’t need to buy anything to use the core functions.

You do not need to use the same app. Similar BLE apps should also be suitable, most work in the same way :-)
Circuit
First set up an Arduino and a HM-10.
– Arduino D2 (software serial RX) to HM-10 TX pin
– Arduino D3 (software serial TX) to HM-10 RX pin via a voltage divider
– GND to GND
– +5 to HM-10 VCC
*The pins on the actual HM-10 (the small daughter board) are 3.3v only. They are not officially 5v tolerant so use a voltage divider or something else to bring the voltage down to 3.3v.

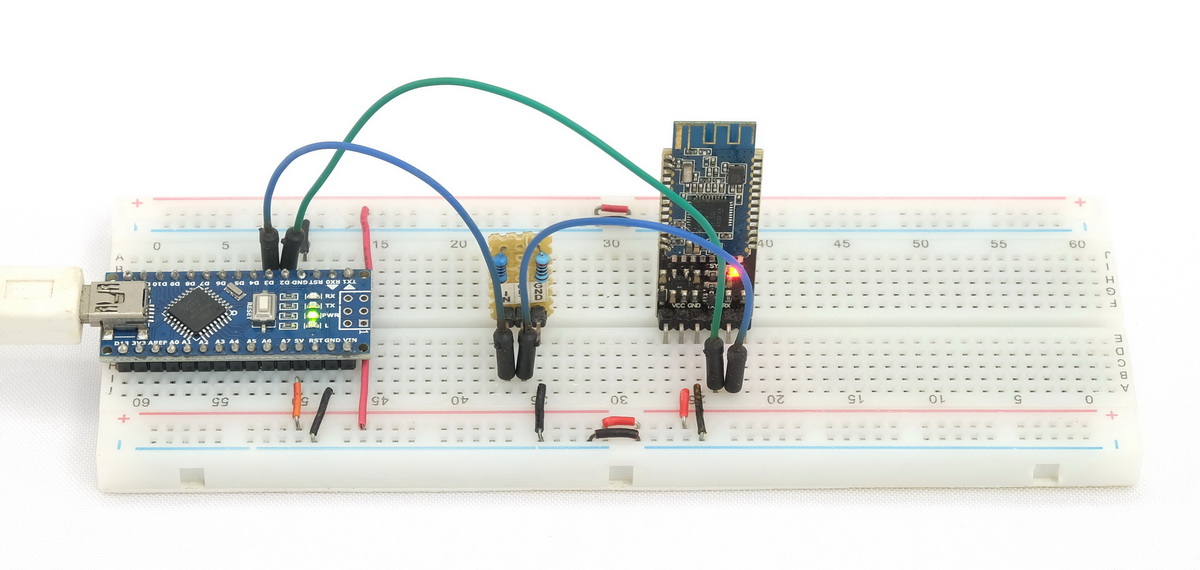
The HM-10 is a 3.3v device. The breakout board converts the +5v vcc to 3.3v to power the HM-10 but the RX pin is still 3.3v. Therefore, we need to bring down the Arduino 5V TX pin to 3.3V. A simple way to do this is by using a voltage divider made from 2 resistors. I use a 1k ohm resistor and a 2k ohm resistor.
The Arduino will see the 3.3v signal from the HM-10 TX pin as HIGH so we can connect the HM-10 TX pin directly to the Arduino RX pin (D8).
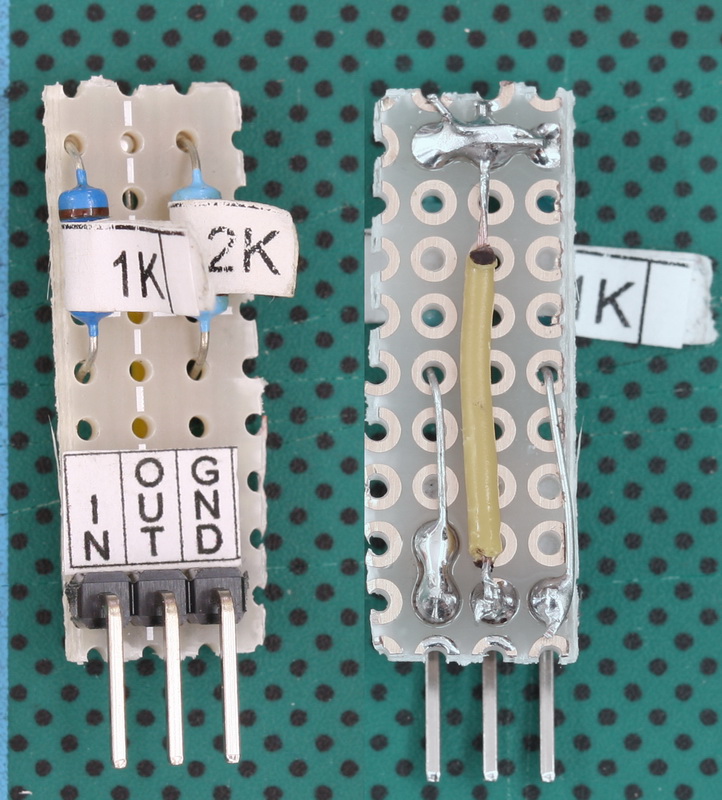
I am using a premade voltage divider.
I make a lot of this kind of breadboard circuit and I made many small breadboard modules. One of these is a voltage divider.
Power on, the LED on the HM-10 should be blinking about once a second.
Serial Sketch
After building the circuit upload the following sketch. This is a simple serial in, serial out program. Whatever the Arduino receives from the serial monitor it relays to the HM-10. What ever it receives from the HM-10 it copies to the serial monitor.
I am using a HM-10 with V710 firmware. This uses a 9600 baud rate and doesn’t care if you use line end characters (/n/r) or not. If you add line end characters so will the HM-10, if you don’t, then it wont.
The below sketch was written for the older HM-10 firmwares and the sketch manages line endings for me, so although I am adding them in the serial monitor, they are not being sent to the HM-10. The sketch prints the characters in the serial monitor it does not send them to the HM-10. This helps make the examples easier to read.
/*
 *  sketch: SerialPassThrough_SoftwareSerial_NL
 *  martyncurrey.com
 *
 *  Use software serial to talk to serial/UART connected device
 *  What ever is entered in the serial monitor is sent to the connected device
 *  Anything received from the connected device is copied to the serial monitor
 *
 *  Pins
 *  BT VCC to Arduino 5V out.
 *  BT GND to GND
 *  Arduino D2 (Arduino RX)
 *  Arduino D3 (Arduino TX)
 *
 *  Assumes a 5V Arduino is being used
 *  If the connected device is 3.3v add a voltage divider (5v to 3.3v) between Arduino TX and device RX
 *  Arduino RX to device TX does not need a voltage divider. The Arduino will see 3.3v as high
 *
 */

#include <SoftwareSerial.h>
SoftwareSerial softSerial(2, 3); // RX, TX

char c=' ';
boolean NL = true;

void setup()
{
    Serial.begin(9600);
    Serial.print("Sketch:   ");   Serial.println(__FILE__);
    Serial.print("Uploaded: ");   Serial.println(__DATE__);

    softSerial.begin(9600);
    Serial.println("softSerial started at 9600");

    Serial.println("Set line endings to 'Both NL & CR'");
}

void loop()
{
    // Read from the UART module and send to the Serial Monitor
    if (softSerial.available())
    {
        c = softSerial.read();
        Serial.write(c);
    }

    // Read from the Serial Monitor and send to the UART module
    if (Serial.available())
    {
        c = Serial.read();

        // do not send line end characters to the HM-10
        if (c!=10 & c!=13 ) {   softSerial.write(c); }

        // Echo the user input to the main window.
        // If there is a new line print the ">" character.
        if (NL) { Serial.print("\r\n>");  NL = false; }
        Serial.write(c);
        if (c==10) { NL = true; }
    }

} // void loop()
After uploading the sketch, open the serial monitor and you should see something similar to:

At the bottom of the serial monitor, set the baud rate to 9600 and select Both NL & CL.![]()
The HM-10 requires commands to be in upper case and, depending on the firmware version, normally without line end characters added.
The sketch takes care of the line end characters for me, it does not send them to the Bluetooth module but will print them when echoing the command to the serial monitor main window. This is not really required but it means the commands will be on individual lines and be easier to read in the following examples. Normally, when working with the HM-10, everything is printed on one line.
Remember when using other sketches or a USB to serial UART adapter to set line endings to “No line ending” at the bottom of the serial monitor.
Upload the sketch and open the serial monitor.
Use the AT command to confirm communication is working. If it is the HM-10 will reply with an OK


BLE Scanner
Open BLE Scanner
If the app does not auto scan, click the scan button. Amongst all the BLE devices there should be the HM-10.

Connect to the HM-10 by tapping the CONNECT button next the HM-10 entry. The LED on the HM-10 should stop blinking (should be on).

The app connects to the HM-10 and lists the services the HM-10 is using.

Open the GENERIC ACCESS service by clicking on it. Tap the little R button to READ the device name.


Next up, try sending data. First from the Arduino to the app, and then, from the app to the Arduino.
Send Data To The App
Close the GENERIC ACCESS service by clicking the header.

Open CUSTOM SERVICE

When sending data via the UART connection, the data is transmitted through the custom service.

To see this happening, click the ![]() notify button. The button will turn green to show it is active.
notify button. The button will turn green to show it is active.

.Jump back to the serial monitor. Enter Hello and hit send

In BLE Scanner, as if by magic, Hello should appear.

To send text from the app to the serial monitor, tap the ![]() Write icon and enter something in the popup text box.
Write icon and enter something in the popup text box.
You will notice that the value of the custom characteristic changes to whatever you typed. The text should also appear in the serial monitor.


That’s it. You are now able to send and receive data using a BLE aopp.
Hi I found a strange error, all connections seem to be correct because In the BLE scanner application I can send text to the computer and vice versa. But I can’t send AT Command to bluetooth via serial monitor on computer. HM10 doesn’t respond anything. If I type a word, BLE Scanner reveive it not a word but a characters one by one. My HM10 version is 608.
Apparently there is a delay in the loop, sorry my bad.